Use the extended API on FMZ Quant Trading Platform to realize TradingView alert signal trading
The extended API on FMZ Quant Trading Platform has been upgraded recently to support the direct access, so that it can easily send the TradingView alert signal to the FMZ Quant Trading Platform robot for automatic trading. If you don't know what the extension API is, listen to me carefully.
The extended API on FMZ Quant Trading Platform
Some links to the API documentation on FMZ (https://www.fmz.com/api)
The main function of the expanded API is to provide interfaces for various functions on the FMZ Quant Trading Platform for programmatic operations, such as starting robots in batches simultaneously, timing robots to start and stop, reading robot information details, etc. We use the extended API on FMZ Quant Trading Platform to realize the demand plan of TradingView alert signal trading, which only uses the CommandRobot(RobotId, Cmd) interface in the extended API. This interface can send interactive instructions to the robot with a specified ID, and the robot can execute corresponding operations (such as placing an order to buy, selling, etc.) after receiving the instructions.
To use the extended API, you need to create an API KEY for your own FMZ account first:

The secret key of API KEY consists of access key and secret key. API KEY is the key to quantify the FMZ Quant Trading Platform of the programmatic operation, so it must be properly kept and not disclosed. When creating an extended API KEY on FMZ, you can specify permissions. For example, the above figure only gives the API KEY permission to access the CommandRobot(RobotId, Cmd) interface. For this example, based on security considerations, please only give the extended API KEY on FMZ permission to access the CommandRobot(RobotId, Cmd) interface.
Direct access mode of the extended API
The direct access mode means that the API KEY is directly written in the URL Query. For example, the URL for accessing the extended API on FMZ Quant Trading Platform can be written as:
javascripthttps://www.fmz.com/api/v1?access_key=xxx&secret_key=yyyy&method=CommandRobot&args=[186515,"ok12345"]
Where https://www.fmz.com/api/v1 is the interface address, ? is followed by Query, parameter access_key secret key is represented by xxx for example (fill in the access_key of your own FMZ account when you use it). The parameter secret_key is represented by yyyy (fill in your own account secret_key when you use it). The parameter method is the specific name of the extended API interface to be accessed, and args is the parameter of the method interface to be called.
We use TradingView as the signal source to send transaction commands to the FMZ Quant Trading Platform robot. In fact, we only use the CommandRobot interface.
TradingView
First, you must have a TradingView Pro level account. The WebHood function in the alert cannot be used at the Basic level.
In the TradingView chart, you can add an indicator to the chart or other script algorithms. Here, we use the most commonly used MACD indicators, and then we set the K-line period to 1 minute (for faster signal triggering and easy demonstration).
Right click on the chart and select "Add Alert" from the pop-up menu.
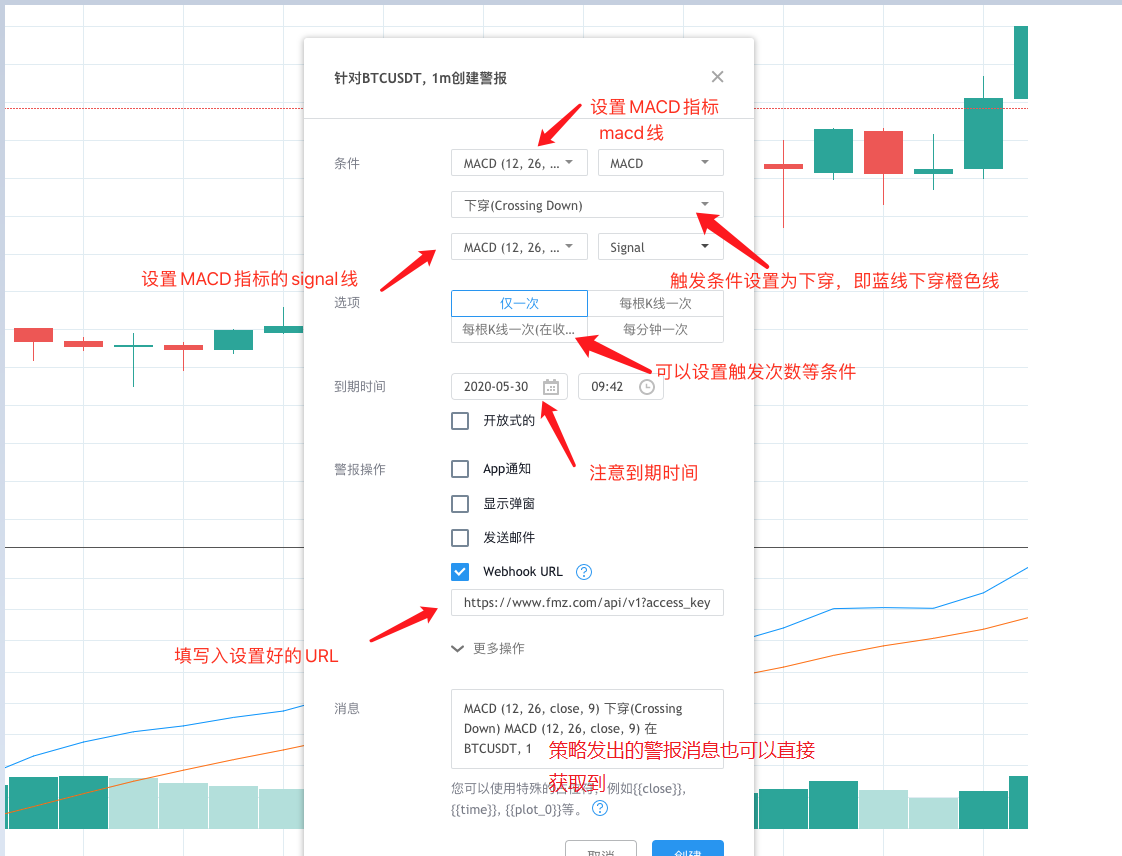
Set WebHook in the "Alert" pop-up window. At this point, we can run the monitoring signal robot on the FMZ Quant Trading Platform first.

Monitoring signal ordering robot
Strategy source code:
pine// Global variable
var BUY = "buy"     // Note: The command used for spot
var SELL = "sell"   //      The command used for spot
var LONG = "long"   // The command used for future
var SHORT = "short" // The command used for future
var COVER_LONG = "cover_long"   // The command used for future
var COVER_SHORT = "cover_short" // The command used for future

function main() {
    // Clear the log and delete it if not needed
    LogReset(1)

    // Set precision
    exchange.SetPrecision(QuotePrecision, BasePrecision)

    // Identify future or spot
    var eType = 0
    var eName = exchange.GetName()
    var patt = /Futures_/
    if (patt.test(eName)) {
        Log("The added exchange is a futures exchange:", eName, "#FF0000")
        eType = 1
        if (Ct == "") {
            throw "Ct Contract set to null"
        } else {
            Log(exchange.SetContractType(Ct), "set contract:", Ct, "#FF0000")
        }
    } else {
        Log("The added exchange is a spots exchange:", eName, "#32CD32")
    }

    var lastMsg = ""
    var acc = _C(exchange.GetAccount)
    while(true) {
        var cmd = GetCommand()
        if (cmd) {
            // Detect interactive commands
            lastMsg = "command:" + cmd + "time:" + _D()
            var arr = cmd.split(":")
            if (arr.length != 2) {
                Log("cmd incorrect information:", cmd, "#FF0000")
                continue
            }

            var action = arr[0]
            var amount = parseFloat(arr[1])

            if (eType == 0) {
                if (action == BUY) {
                    var buyInfo = IsMarketOrder ? exchange.Buy(-1, amount) : $.Buy(amount)
                    Log("buyInfo:", buyInfo)
                } else if (action == SELL) {
                    var sellInfo = IsMarketOrder ? exchange.Sell(-1, amount) : $.Sell(amount)
                    Log("sellInfo:", sellInfo)
                } else {
                    Log("The spots exchange is not supported!", "#FF0000")
                }
            } else if (eType == 1) {
                var tradeInfo = null
                var ticker = _C(exchange.GetTicker)
                if (action == LONG) {
                    exchange.SetDirection("buy")
                    tradeInfo = IsMarketOrder ? exchange.Buy(-1, amount) : exchange.Buy(ticker.Sell, amount)
                } else if (action == SHORT) {
                    exchange.SetDirection("sell")
                    tradeInfo = IsMarketOrder ? exchange.Sell(-1, amount) : exchange.Sell(ticker.Buy, amount)
                } else if (action == COVER_LONG) {
                    exchange.SetDirection("closebuy")
                    tradeInfo = IsMarketOrder ? exchange.Sell(-1, amount) : exchange.Sell(ticker.Buy, amount)
                } else if (action == COVER_SHORT) {
                    exchange.SetDirection("closesell")
                    tradeInfo = IsMarketOrder ? exchange.Buy(-1, amount) : exchange.Buy(ticker.Sell, amount)
                } else {
                    Log("The futures exchange is not supported!", "#FF0000")
                }
                if (tradeInfo) {
                    Log("tradeInfo:", tradeInfo)
                }
            } else {
                throw "eType error, eType:" + eType
            }
            acc = _C(exchange.GetAccount)
        }
        var tbl = {
            type : "table",
            title : "status information",
            cols : ["data"],
            rows : []
        }
        // tbl.rows.push([JSON.stringify(acc)])   // Use it when testing
        LogStatus(_D(), eName, "Last received command:", lastMsg, "\n", "`" + JSON.stringify(tbl) + "`")
        Sleep(1000)
    }
}
Strategy source code (https://www.fmz.com/strategy/203063)
The strategy code is very simple. It detects the return value of the GetCommand function. When an interactive message is sent to the strategy program, the GetCommand function returns the message, and the strategy program makes the corresponding transaction operation according to the message content. The interactive button has been set on this strategy to test the interactive function. For example, run this strategy and configure the robot with WexApp, a simulation exchange of the FMZ Quant Trading Platform.
We click the interactive button to test the robot's function of receiving the order to buy, then we can see that the command string received by the robot is: buy:0.01.
We only need to make the WebHook request URL when the TradingView alert is triggered to access the CommandRobot interface of the FMZ Quant Trading Platform extended API, the parameter carried is buy:0.01.
Set WebHook of TradingView
Back in the TradingView, we fill in the URL of the WebHook. Fill in your own API KEY for the parameters access_key, secret_key. The method is fixed. We only need to access the CommandRobot extendedAPI interface. The parameter args is in the form of [Robot ID, Command String]. We can obtain the robot ID through the robot page, directly as shown in the figure:

This time, we let the signal trigger, buy 0.02 coins, and the command string is: buy:0.02. Then the WebHook URL is complete. This method only supports writing the signal in the URL. If you want to obtain the content of the alert message that can be sent by the TV strategy itself, refer to https://www.fmz.com/api# direct verification.
javascripthttps://www.fmz.com/api/v1?access_key=e3809e173e23004821a9bfb6a468e308&secret_key=45a811e0009d91ad21154e79d4074bc6&method=CommandRobot&args= [191755,"buy:0.02"]
Set on the TradingView:

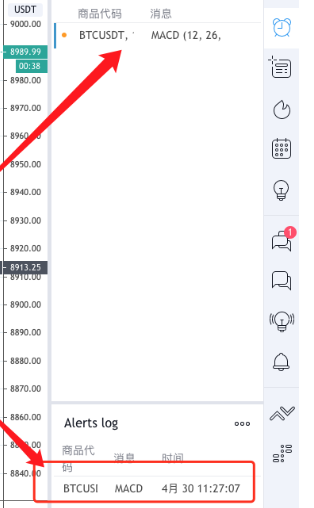
Wait for the signal to trigger...
Wait for the signal to trigger...
Wait for the signal to trigger...
...

Then the robot will receive the signal, in this way, we can use the various chart functions and indicator algorithms on TradingView to cooperate with the strategy robot of the FMZ Quant Trading Platform to achieve the automatic trading you want. Compared with the difficulty of porting the strategies on TradingView to JavaScript and Python languages, the difficulty is reduced.
The strategy code of "robot for placing orders by monitoring signals" is only for learning and research. The use on real bot needs to be self optimized and adjusted to support futures. It is recommended to set it to the market price order mode. See the strategy code parameters for details.
If you have any questions or suggestions, please feel free to leave a message.
